To draw a t ext a route (or path) , the first thing we have to do is open the Gimp and go to "File / New ".
Then return to the toolbox, we seek "Path tool" and we click on it.
then draw the path you want and for that reason we made different click on the image editing window. Thus, the strokes are generated.
After placing the cursor on the line and holding the left button, so we can adjust the curvature of it.
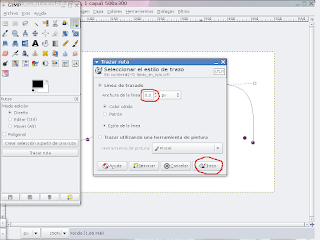
When we get the desired route click "Draw Route ".

then opens a new window where you can adjust the line size.
If we want to line the route is not place you see "line size 0.
After pressing the" Stroke ", lower right corner. We already have the path made.
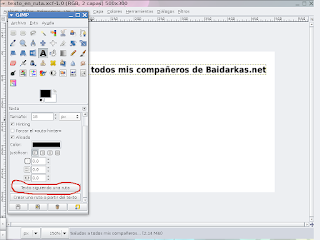
Now we write the text. To do this we click on the "Text Tool " and write your text.
 Then click on the button "Text following a path"
Then let "Dialogues / Pathways" . Click on "Routes"
box opens dialogue of Routes.
Right-click on the "Route we have created" and a popup menu. In that menu choose "Path to Selection"
can be observed that the text is selected.
Now, without touching anything, let "Layer / New Layer" . This will create a new layer.
proceed
to give color to the text.
To do this we click on the "Mesh Tool" . With this tool you click on a degraded area of \u200b\u200bthe image editing window. We hold and drag gradient to text.
To clear black text write initially closed in the layers window, the darling of the layer.
The background gradient that appears in the image that started this post was made in fourth layer. locate it deep and mezcha tool "I painted.
Then chose the area where the text had been written (with the selection tool). I went to "Picture" and clicked on "Trim to Selection"
To make this task consulted this site who in turn recommended this Tutorial and this page.
I hope the explanations will be useful to those who need them. Greetings
visitors to this page.
Then return to the toolbox, we seek "Path tool" and we click on it.
then draw the path you want and for that reason we made different click on the image editing window. Thus, the strokes are generated.
After placing the cursor on the line and holding the left button, so we can adjust the curvature of it.
When we get the desired route click "Draw Route ".

then opens a new window where you can adjust the line size.
If we want to line the route is not place you see "line size 0.
After pressing the" Stroke ", lower right corner. We already have the path made.
Now we write the text. To do this we click on the "Text Tool " and write your text.
 Then click on the button "Text following a path"
 Then let "Dialogues / Pathways" . Click on "Routes"
box opens dialogue of Routes.
Right-click on the "Route we have created" and a popup menu. In that menu choose "Path to Selection"
can be observed that the text is selected.
Now, without touching anything, let "Layer / New Layer" . This will create a new layer.
proceed
to give color to the text.
To do this we click on the "Mesh Tool" . With this tool you click on a degraded area of \u200b\u200bthe image editing window. We hold and drag gradient to text.
To clear black text write initially closed in the layers window, the darling of the layer.
The background gradient that appears in the image that started this post was made in fourth layer. locate it deep and mezcha tool "I painted.
Then chose the area where the text had been written (with the selection tool). I went to "Picture" and clicked on "Trim to Selection"
I hope the explanations will be useful to those who need them. Greetings
visitors to this page.


