E. CONFERENCES PHYSICS EJEA MORE INTENSE COLORS
The weekend past, conferences were held in provincial physical education Ejea de los Caballeros.
As in almost every day, and after the morning presentations and afternoon workshops, evening comes ........ Here I leave some of the photos that I have been coming in of those nights "Ejeanas" ...
The chronicle of the days the count Edu on his blog that has more patience and more time than I to write ("nosoloef.blogspot.com)
.... IN THE NEXT SEPTEMBER IN HUESCA!
Saturday, June 14, 2008
Wednesday, June 11, 2008
The Reader's Edge French?
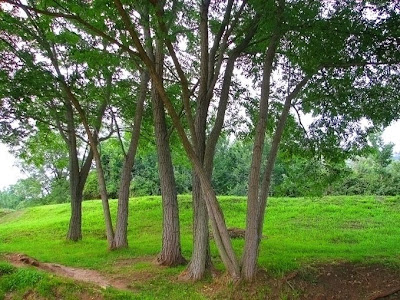
Although I have not much time, I've found shortie but impressive this tutorial to intensify the color of our photos.
Often we can find a few images with vivid colors. This retouch these images will gain strength through greater color saturation.
The process to follow is:
1. Open the original image.

2. Duplicate layer (Ctrl + j)
3. Image / Adjustments / Hue-Saturation. Adjust the Saturation to 55.
4. Filter / Noise / Median. Set the radius to 4.
5. Filter / Blur / Gaussian Blur. Set the Radius to 3.
6. Change blending mode of the duplicated layer to Color.
7. Changing the Opacity percentage duplicate layer you can adjust the color saturation of the final image.
Sunday, June 1, 2008
Rotel, Veveeta, Chicken, Pasta
ORTON EFFECT
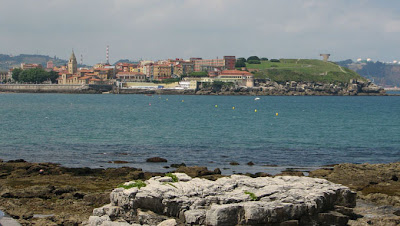
The method was developed by Michael Orton Orton, famous photographer of nature and landscape photographs provided its an unreal with a touch of romanticism. To achieve this effect in analog, shot two photographs. One very focused with apertures between f16 and f22, and overexposed two steps. And the other out of focus with large apertures between f2.8 and f4, and overexposed one step. Then he would have what is called the Sandwich Orton, hitting each other.
But let's see how to get this effect digitally using Photoshop.
first thing we to know is that this effect does not get along with all the photographs. Works well with some photographs of nature and landscape full of color and elements. Can also be used for portraits, but be careful not to use too much, especially in the skin.
1.-Open the photo, duplicate the background layer and rename it as "Focused."
2.-Create another duplicate layer of the layer "Focused." And we changed the blending mode to Screen. (We have 3 layers)
3.-Selected "copy of Focus" merge it down.
4.-Selected
layer "Focused" and duplicate it rename it to "Out of Focus." 5.-A
this we applied a Gaussian blur filter. According to the resolution of the image you're using, we'll add more or less blur. We can start from a radius of 12 and we value playing without completely losing the details in that layer.
Filters> Blur> Gaussian Blur
6.-Change the blending mode of layer "Out of Focus" to Multiply.
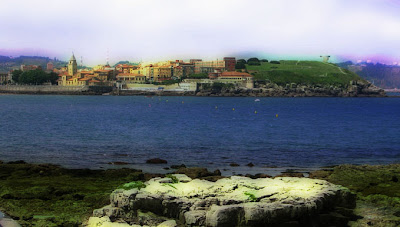
And now we can play with the curves, brightness and contrast levels or anything else. In the resulting picture I have applied some curves and a bit of brightness:
and ready.!
As always, I hope you like it.
I leave before and after study with a photo Gijon Beach ...


Saturday, May 17, 2008
Peeing A Lot And Pain In Lower Abdominal
Dave Hill Effect
Dave Hill is one of today's hottest photographers. For his unreality, his style like some more and others less. But no doubt that, today, his technique is on the lips of many fans to digital imaging. What you'll find below is a humble attempt to reproduce the environment Dave Hill in a few easy steps with Photoshop.
The Starting Point
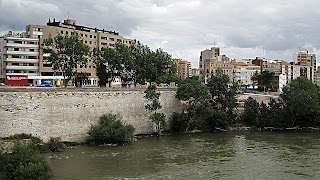
This is the photo that I was leaving. This is a picture of one of the works on the banks of the Ebro in Zaragoza. Before you begin, rescale the picture (is wrong framed ...)

Step 1: Step Height with Intense Light Blend Mode
the following steps:
* Duplicate the current layer (Layer -> Duplicate Layer ...)
* Filter -> Other -> High Pass ... The radio to select depends on the intensity of the effect. You must play with the values \u200b\u200bto make it your own. In my case, I used a radius of 3.8
* In the layers palette, choose the blending mode 'Heavy Light'
* Merge the layers (Layer -> Merge Visible ...)
Step 2: Targeting with Mode Color Fusion
then does the following:
* Duplicate the current layer (Layer -> Duplicate Layer ...)
* Filter -> Other -> High Pass ... Play with the radius to make it your own. In my case, I used a radius of 6.3
* In the layers palette, choose the blending mode 'color'
* Set the layer Opacity to a value around 40%
* Merge the layers (Layer -> Merge Visible ...)
Step 3: Blur and noise
is already. The next step is:
* Duplicate the current layer (Layer -> Duplicate Layer ...)
* Filter -> Blur -> Gaussian Blur ... I used a radius of 7. Again, you can play with different values \u200b\u200bto be left to your taste
* Filter -> Noise -> Add Noise ... You may want to skip this step, but personally, I like the way it is with a little noise. In my case, 3%
* Adjust the layer opacity to a value around 35%
* Merge the layers (Layer -> Merge Visible ...)
Step 4: Unsharp Mask and Final Adjustments
* Filter -> Sharpen -> Unsharp Mask ... Reference values: Amount 90%, Radio 10, Threshold 2
is time to make final adjustments. You might have been a somewhat saturated colors, so you may want to desaturate. You may also want to play with the brightness global image: use the levels tool.
End result:
If you Liais, I leave here a videotutorial 
Dave Hill is one of today's hottest photographers. For his unreality, his style like some more and others less. But no doubt that, today, his technique is on the lips of many fans to digital imaging. What you'll find below is a humble attempt to reproduce the environment Dave Hill in a few easy steps with Photoshop.
The Starting Point
This is the photo that I was leaving. This is a picture of one of the works on the banks of the Ebro in Zaragoza. Before you begin, rescale the picture (is wrong framed ...)

Step 1: Step Height with Intense Light Blend Mode
the following steps:
* Duplicate the current layer (Layer -> Duplicate Layer ...)
* Filter -> Other -> High Pass ... The radio to select depends on the intensity of the effect. You must play with the values \u200b\u200bto make it your own. In my case, I used a radius of 3.8
* In the layers palette, choose the blending mode 'Heavy Light'
* Merge the layers (Layer -> Merge Visible ...)
Step 2: Targeting with Mode Color Fusion
then does the following:
* Duplicate the current layer (Layer -> Duplicate Layer ...)
* Filter -> Other -> High Pass ... Play with the radius to make it your own. In my case, I used a radius of 6.3
* In the layers palette, choose the blending mode 'color'
* Set the layer Opacity to a value around 40%
* Merge the layers (Layer -> Merge Visible ...)
Step 3: Blur and noise
is already. The next step is:
* Duplicate the current layer (Layer -> Duplicate Layer ...)
* Filter -> Blur -> Gaussian Blur ... I used a radius of 7. Again, you can play with different values \u200b\u200bto be left to your taste
* Filter -> Noise -> Add Noise ... You may want to skip this step, but personally, I like the way it is with a little noise. In my case, 3%
* Adjust the layer opacity to a value around 35%
* Merge the layers (Layer -> Merge Visible ...)
Step 4: Unsharp Mask and Final Adjustments
* Filter -> Sharpen -> Unsharp Mask ... Reference values: Amount 90%, Radio 10, Threshold 2
is time to make final adjustments. You might have been a somewhat saturated colors, so you may want to desaturate. You may also want to play with the brightness global image: use the levels tool.
End result:

If you Liais, I leave here a videotutorial
Thursday, May 8, 2008
Fence Wood Corrugated Iron
HDR PHOTOS
Photography HDR (or HDRI, High Dynamic Range Imaging) is an image processing technique that seeks to cover as range of exposure levels in all areas. This is achieved by blending several photos of the same image with different exposures.
HDR technique allows all areas of the picture are perfectly exposed, but have very different brightness levels and contrasted. This gives details on the entire picture even a single shot has a great contrast between highlights and shadows.
There are several programs to assist in transforming photographs into HDR. Photoshop CS2incorpora this functionality, but without doubt the most known and used for this task is Photomatix. Another option is Artizen HDR.
Here I leave a tutorial sencillito to do so. 
Photography HDR (or HDRI, High Dynamic Range Imaging) is an image processing technique that seeks to cover as range of exposure levels in all areas. This is achieved by blending several photos of the same image with different exposures.
HDR technique allows all areas of the picture are perfectly exposed, but have very different brightness levels and contrasted. This gives details on the entire picture even a single shot has a great contrast between highlights and shadows.
There are several programs to assist in transforming photographs into HDR. Photoshop CS2incorpora this functionality, but without doubt the most known and used for this task is Photomatix. Another option is Artizen HDR.
Here I leave a tutorial sencillito to do so.
Saturday, April 19, 2008
How Many Citalopram To Overdose??
TOUCH WITH REALITY OR PHOTOSHOP ??!!!

The other day I sent this photo in an email, and I left the question ... true or retouching?. Not that I like bodybuilding, and to be honest, I think anything that damages the eye, apart from not share that philosophy aférrima bodybuilders who have deformed the body.
one thing to have an athletic body but this ....... THIS IS HORRIBLE !!!!!!!!!!!
But he would not let the opportunity to share with you all and tell me: what do you think actually
or retouching ???!!!
For the more curious I leave the solution .... this guy is real!
How many want a boyfriend so ???!!!! jejejeje 

The other day I sent this photo in an email, and I left the question ... true or retouching?. Not that I like bodybuilding, and to be honest, I think anything that damages the eye, apart from not share that philosophy aférrima bodybuilders who have deformed the body.
one thing to have an athletic body but this ....... THIS IS HORRIBLE !!!!!!!!!!!
But he would not let the opportunity to share with you all and tell me: what do you think actually
or retouching ???!!!
For the more curious I leave the solution .... this guy is real!
How many want a boyfriend so ???!!!! jejejeje
Friday, April 11, 2008
Pokemon Leaf Green Rom
PHOTOS AGED
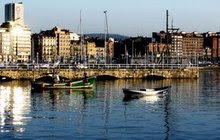
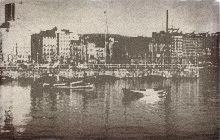
Snooping a bit by the web, I found this page that contains an online photo envejedor .
The page is in Japanese, but it is very intuitive. Just point to the file where you have the picture of aging, or report the url and the older you automatically.
Although the effect can be achieved much improved with photoshop, not bad as an alternative you feel like those old picture quickly and easily.


Sunday, March 30, 2008
Womengenital Painful Tattoo
Wednesday, March 26, 2008
Jello And Candy Plant Cell Model
Scans
That may have been that vacation?
Once back, I present a post by juan garcia (jggweb) that caught my attention being. It's about the scan.
"is to obtain images with a scanner playing with the composition opaque, movement, lighting and backgrounds.
A digitally captured images with an A4 scanner is applied a minimum post-processing (levels, brightness / contrast and saturation).
The process: 1 .- Preview
and sketch of the image you want to create.
2 .- Preparation of components and accessories, lights, funds, stopwatch ...
3 .- Preparing the Scanner: 300dpi resolution, brightness / contrast and color or B / N. 4 .- Composite
stage: distribution of elements. 5 .- Light
.
6 .- Election of the fund.
7 .- Intervention or not during scanning. "
Rafael Montes, professional photographer, has produced a manual quite interesting to show their work. Do not fail to take a look. (CLICK ON THE LINK)
" Scans MANUAL "
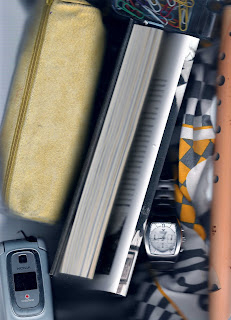
Hope you like it! is a different way of taking pictures .... 
That may have been that vacation?
Once back, I present a post by juan garcia (jggweb) that caught my attention being. It's about the scan.
"is to obtain images with a scanner playing with the composition opaque, movement, lighting and backgrounds.
A digitally captured images with an A4 scanner is applied a minimum post-processing (levels, brightness / contrast and saturation).
The process: 1 .- Preview
and sketch of the image you want to create.
2 .- Preparation of components and accessories, lights, funds, stopwatch ...
3 .- Preparing the Scanner: 300dpi resolution, brightness / contrast and color or B / N. 4 .- Composite
stage: distribution of elements. 5 .- Light
.
6 .- Election of the fund.
7 .- Intervention or not during scanning. "
Rafael Montes, professional photographer, has produced a manual quite interesting to show their work. Do not fail to take a look. (CLICK ON THE LINK)
" Scans MANUAL "

Hope you like it! is a different way of taking pictures ....
Thursday, March 6, 2008
Free Treasure Chest Toy Box Plans
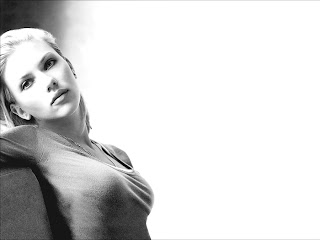
PORTRAITS IN HIGH KEY
The high key photography can be defined as one in which there are no soft black and white but gray, if the picture is in black and white;
or has very soft tones and colors and "faded" if the picture is in color.
The high key is typically used when you want soft and charming portraits, is widely used in portraits of women or children.
The first thing you need is an image with good focus and lighting of the main subject and background, if possible of course ... and so the effect will be better ... Open the ps
:
1 .- Once we open the picture to change the mode to Lab color ... to do so go to Image>> Mode> Lab Color
2 .- Then we to the channel window and choose the channel lighting. the rest will deselect. 3 .-
once elected the illumination channel, we now spend our image to b & n.. We are going to image>> mode> grayscale. (There are many ways and better ways to spend a b & w, but this is faster and in this case we had better)
4 .- When asked to discard the other channels ok ... we give
5 .- Well now let's apply a curves adjustment layer .. We are going to layers>> new adjustment layer> curves .. 6 .- will
some parameters about 15 input / 8 output.
7 .- Now let's apply a Levels adjustment layer .. We are going to Layers>> new adjustment layer> levels ...
8 .- Here's values \u200b\u200bought to taste and then adjust according to you go previewing the image, as each photo requires specific values. In this picture, I used the following: input: 52, 1.80, 223 Output: 0; 255
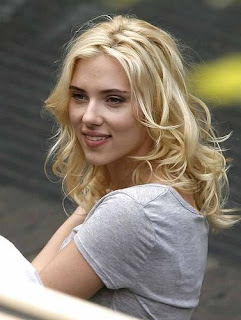
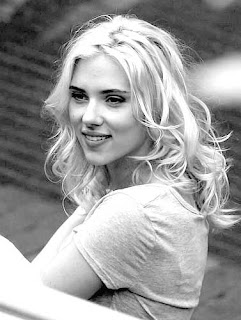
And here I leave the result.
By the way, say that the girl in the picture makes me !!!!!!!! loocoooooo BEFORE
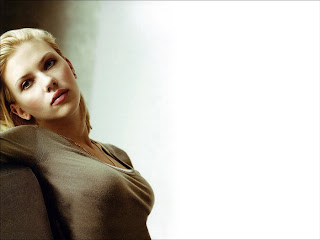
AFTER
Hope you liked it. and will you tell me .... greetings to everyone!! 
The high key photography can be defined as one in which there are no soft black and white but gray, if the picture is in black and white;
or has very soft tones and colors and "faded" if the picture is in color.
The high key is typically used when you want soft and charming portraits, is widely used in portraits of women or children.
The first thing you need is an image with good focus and lighting of the main subject and background, if possible of course ... and so the effect will be better ... Open the ps
:
1 .- Once we open the picture to change the mode to Lab color ... to do so go to Image>> Mode> Lab Color
2 .- Then we to the channel window and choose the channel lighting. the rest will deselect. 3 .-
once elected the illumination channel, we now spend our image to b & n.. We are going to image>> mode> grayscale. (There are many ways and better ways to spend a b & w, but this is faster and in this case we had better)
4 .- When asked to discard the other channels ok ... we give
5 .- Well now let's apply a curves adjustment layer .. We are going to layers>> new adjustment layer> curves .. 6 .- will
some parameters about 15 input / 8 output.
7 .- Now let's apply a Levels adjustment layer .. We are going to Layers>> new adjustment layer> levels ...
8 .- Here's values \u200b\u200bought to taste and then adjust according to you go previewing the image, as each photo requires specific values. In this picture, I used the following: input: 52, 1.80, 223 Output: 0; 255
And here I leave the result.
By the way, say that the girl in the picture makes me !!!!!!!! loocoooooo BEFORE

AFTER


Hope you liked it. and will you tell me .... greetings to everyone!!
Sunday, March 2, 2008
Scholarships For Spondylitis
NATIONAL GEOGRAPHIC LAUNCHES "MyShot"

the world famous National Geographic magazine has just launched a new web service for photographers around the world.
"MyShot" will allow you to build your own website to showcase your best photos, up to 100 images.
most attractive of the gallery and storage system that offers National Geographic is undoubtedly the ability to send images to the section entitled "yourshot" where daily the magazine's editors chose 12 pictures that are rated by readers .
At the end of each month, the winner, the magazine is published in physics, followed by more than 40 million people worldwide.
"Good advertising?
will to dare .......... 

the world famous National Geographic magazine has just launched a new web service for photographers around the world.
"MyShot" will allow you to build your own website to showcase your best photos, up to 100 images.
most attractive of the gallery and storage system that offers National Geographic is undoubtedly the ability to send images to the section entitled "yourshot" where daily the magazine's editors chose 12 pictures that are rated by readers .
At the end of each month, the winner, the magazine is published in physics, followed by more than 40 million people worldwide.
"Good advertising?
will to dare ..........
Sunday, February 17, 2008
How To Heal Waxing Bruising
Catchlight: The Brightness of Eyes
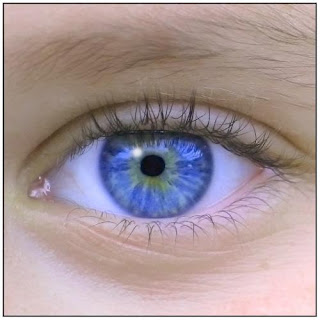
The Catchlights are simply shines on the surface of the eye to add depth and life to the eyes in a portrait. The expressive eyes shining.
In photography, the location of the catchlights are determined by the lighting scheme: the main light and fill, height and angle and distance to the camera. A studio portrait Catchlight get one in each eye (the reflection of the main light). If the eye was a clock, try to make the brightness appear in the 10 to 2 hours.
It is best to capture the catchlights during shooting, but the master photographers were using rudimentary methods in the darkroom to brightening eyes. Today we can add these important glosses to the next digital retouching:
1 .- Open image in PhotoShop. 2 .- New Layer
'll call Catchlights.
3 .- With the Brush tool, foreground color white, Opacity 75%, 50% hardness brush and click on the appropriate size where we want to add brightness. 4 .-
Filter / Blur / Gaussian blur to blur somewhat the point.
5 .- Reduce the Opacity of the layer Catchlight until we get the desired result. 

The Catchlights are simply shines on the surface of the eye to add depth and life to the eyes in a portrait. The expressive eyes shining.
In photography, the location of the catchlights are determined by the lighting scheme: the main light and fill, height and angle and distance to the camera. A studio portrait Catchlight get one in each eye (the reflection of the main light). If the eye was a clock, try to make the brightness appear in the 10 to 2 hours.
It is best to capture the catchlights during shooting, but the master photographers were using rudimentary methods in the darkroom to brightening eyes. Today we can add these important glosses to the next digital retouching:
1 .- Open image in PhotoShop. 2 .- New Layer
'll call Catchlights.
3 .- With the Brush tool, foreground color white, Opacity 75%, 50% hardness brush and click on the appropriate size where we want to add brightness. 4 .-
Filter / Blur / Gaussian blur to blur somewhat the point.
5 .- Reduce the Opacity of the layer Catchlight until we get the desired result.
Friday, February 8, 2008
Logitech Hack Bluetooth
EFFECT PANNING
panning effect is the effect created when shooting a moving object so that we get that the object is in focus and frozen while the background is moved.
In short, the guy in the picture who pedals his bike, it is clear that is in motion, but has managed to focus and static display. Meanwhile, the fund is completely moved.
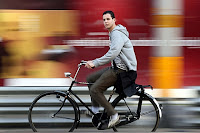
The way to get this kind of photography is simple, but requires patience and lots of practice, since it is not easy to get good photos. To use the panning effect (or do a panning) we have to do is:
* Use a long exposure time (which we will adjust depending on the conditions under which we make the photo). We can start with 1 / 30, for example.
* At the time we shoot the picture, we must follow the object photographed with our objective, usually rotating on our axis or horizontal scrolling.
* One possibility is to use the slow sync flash, but adding this variable probably force you to do more testing, but you can achieve spectacular results.
The main difficulty is getting the subject of the photo is properly focused. We will evaluate whether to use the autofocus, continuous autofocus mode or manually focus in the area where why we believe it will pass the object to be photographed. This will depend on the camera you have and your ability to do so.
If we used a short exposure time, freeze to the ground both photography and background, and completely lose the sense of speed. You've seen plenty of photos of rallies or formula 1 using this technique.
You? Have you ever tried? 
panning effect is the effect created when shooting a moving object so that we get that the object is in focus and frozen while the background is moved.
In short, the guy in the picture who pedals his bike, it is clear that is in motion, but has managed to focus and static display. Meanwhile, the fund is completely moved.

The way to get this kind of photography is simple, but requires patience and lots of practice, since it is not easy to get good photos. To use the panning effect (or do a panning) we have to do is:
* Use a long exposure time (which we will adjust depending on the conditions under which we make the photo). We can start with 1 / 30, for example.
* At the time we shoot the picture, we must follow the object photographed with our objective, usually rotating on our axis or horizontal scrolling.
* One possibility is to use the slow sync flash, but adding this variable probably force you to do more testing, but you can achieve spectacular results.
The main difficulty is getting the subject of the photo is properly focused. We will evaluate whether to use the autofocus, continuous autofocus mode or manually focus in the area where why we believe it will pass the object to be photographed. This will depend on the camera you have and your ability to do so.
If we used a short exposure time, freeze to the ground both photography and background, and completely lose the sense of speed. You've seen plenty of photos of rallies or formula 1 using this technique.
You? Have you ever tried?
Sunday, January 27, 2008
Schematics 24 Volt Battery Chargers
PAINTING WITH LIGHT
Painting with light ... drawing with light in the air ... this is the effect of this photographic technique.
order to paint with light, we need a place where data were limited lighting, a tripod and a flashlight or laser pointer or even a mobile screen and a little imagination.
This exposure time has to be long, about 20 or 30 segundos.Y RECOMMENDED timer. Give account, that the camera will pick up everything that happens in front of her during the 30 seconds it will cost you finish shooting.
- for example, if we are abroad and have multi-colored lanterns during the exhibition of photography can illuminate the area to be photographed with each of the headlights, being a curious result.
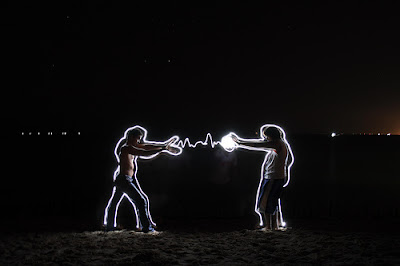
- We can also surround the silhouette of a person ....
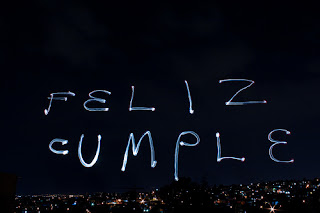
- We can also write ...
- and even scribble ... ESPERO
who decides CONTÉIS TEST AND ME THAT HAS GONE
OS AS A GREETING A TOD @ S
(No need to use the PS to get these results ... just a little practice and patience with the camera .. )  Forgot
Painting with light ... drawing with light in the air ... this is the effect of this photographic technique.
order to paint with light, we need a place where data were limited lighting, a tripod and a flashlight or laser pointer or even a mobile screen and a little imagination.
This exposure time has to be long, about 20 or 30 segundos.Y RECOMMENDED timer. Give account, that the camera will pick up everything that happens in front of her during the 30 seconds it will cost you finish shooting.
- for example, if we are abroad and have multi-colored lanterns during the exhibition of photography can illuminate the area to be photographed with each of the headlights, being a curious result.
- We can also surround the silhouette of a person ....

- We can also write ...

- and even scribble ... ESPERO
who decides CONTÉIS TEST AND ME THAT HAS GONE
OS AS A GREETING A TOD @ S
(No need to use the PS to get these results ... just a little practice and patience with the camera .. )
Saturday, January 19, 2008
Nasal Spray Burn Throat
MEME
Our friend sent me this meme, that even I have no idea what the hell it is, but I promised that I would. Meme would have preferred a naked babes ... but I think it will have to continue sending ... (that little mischief the first who started it ....) Well, there goes the meme: meme
Rules:
- Follow the above statements.
- Each sentence will be affixed to nick the blogger.
- The nickname must have the URL of the blog.
- sent at least two people.
Mr. Rockmántico: "Better to die standing than live on your knees."
Do not Worry, Be Happy: "They did not know it was impossible, they did."
Reuben "If those who speak ill of me know what I think of them speak much worse."
Lara: "If life gives you back, touch his ass."
Javi: "Never give up before you try."
Chasky: "To win you have to know how to lose." Doctor
JB: "Go to him by someone ... ass to less than the 302, has an anal tear."
Dark Lord: "A meal can be nasty, but hunger is disgustingly delicious."
Misstwenty: "An eye for an eye ... and the whole world blind"
IceMan: "We were not known by name but by our actions"
Oblivion: "No somo one, but we are everything. "
The Ugly: "that is ugly, oregano to make the night"
And now, the nominees to continue this meme is .....:
MAMEN: for sure you can think of a good sentence ...
THE HEADS: to see if so update your space and dazzle us with a piece of sentence
a hug for everyone! 
Our friend sent me this meme, that even I have no idea what the hell it is, but I promised that I would. Meme would have preferred a naked babes ... but I think it will have to continue sending ... (that little mischief the first who started it ....) Well, there goes the meme: meme
Rules:
- Follow the above statements.
- Each sentence will be affixed to nick the blogger.
- The nickname must have the URL of the blog.
- sent at least two people.
Mr. Rockmántico: "Better to die standing than live on your knees."
Do not Worry, Be Happy: "They did not know it was impossible, they did."
Reuben "If those who speak ill of me know what I think of them speak much worse."
Lara: "If life gives you back, touch his ass."
Javi: "Never give up before you try."
Chasky: "To win you have to know how to lose." Doctor
JB: "Go to him by someone ... ass to less than the 302, has an anal tear."
Dark Lord: "A meal can be nasty, but hunger is disgustingly delicious."
Misstwenty: "An eye for an eye ... and the whole world blind"
IceMan: "We were not known by name but by our actions"
Oblivion: "No somo one, but we are everything. "
The Ugly: "that is ugly, oregano to make the night"
And now, the nominees to continue this meme is .....:
MAMEN: for sure you can think of a good sentence ...
THE HEADS: to see if so update your space and dazzle us with a piece of sentence
a hug for everyone!
Saturday, January 12, 2008
What Is French Waxing
Wire Pilot
Hello again! First of all, HAPPY NEW YEAR! I know ... late .. but ... I could not update earlier. But now that everything returns to normal, back to the load.
During this holiday, I could not experience anything new to the PS, but if I found something interesting. THE PILOT WIRE!
Wire Pilot is a software specifically designed to remove elements of our photos as annoying as cables, antennas, wires and other linear objects that do not want. It is easy to use and within seconds we can accomplish that other programs, requires much more work and domain.
From the official website you can download this utility or a plugin for Adobe Photoshop (and others like Photoshop Elements, Paint Shop Pro or Corel Photo Paint), which allows retouching a much easier way than usual with the cloning tool.
After uploading the picture you want to fix, all we have to do is place the cursor just above the cable you want to disappear, and change the cursor size to make it as close to the width of the cable and then so just move the cursor while Wire Pilot does the rest of the work.
One way easier and faster than the clone stamp tool!
I hope to serve you!
I've downloaded from here: http://www.colorpilot.com/wire.html
And one example:
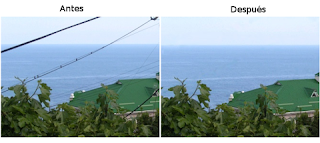
hope you find it useful!
Greetings to everyone!! 
Hello again! First of all, HAPPY NEW YEAR! I know ... late .. but ... I could not update earlier. But now that everything returns to normal, back to the load.
During this holiday, I could not experience anything new to the PS, but if I found something interesting. THE PILOT WIRE!
Wire Pilot is a software specifically designed to remove elements of our photos as annoying as cables, antennas, wires and other linear objects that do not want. It is easy to use and within seconds we can accomplish that other programs, requires much more work and domain.
From the official website you can download this utility or a plugin for Adobe Photoshop (and others like Photoshop Elements, Paint Shop Pro or Corel Photo Paint), which allows retouching a much easier way than usual with the cloning tool.
After uploading the picture you want to fix, all we have to do is place the cursor just above the cable you want to disappear, and change the cursor size to make it as close to the width of the cable and then so just move the cursor while Wire Pilot does the rest of the work.
One way easier and faster than the clone stamp tool!
I hope to serve you!
I've downloaded from here: http://www.colorpilot.com/wire.html
And one example:

hope you find it useful!
Greetings to everyone!!
Subscribe to:
Comments (Atom)


